Sometimes you’ll need cuts from your miter saw more than 45 degrees. Miter saws facilitate cutting accurate angles in lumber with minimal effort. Nonetheless, if you’ve taken some time using a miter saw, then you know that most saws cannot cut more than 45 degrees, with the presets. While some miter saws might go greater than 45 (my beast of a compound sliding miter saw goes upto 55 degrees),
But, what if you require cutting more than 45 Degrees? It might appear disheartening as you start, but learning how to slice an angle exceeding 45 Degrees is a simple task. By the time you’re through with this guide, you should be sufficiently confident to produce any angled cuts you require, using your miter saw to cut more than 45 degrees on your miter saw.
Quick guide to cutting past 45 degree on your miter saw
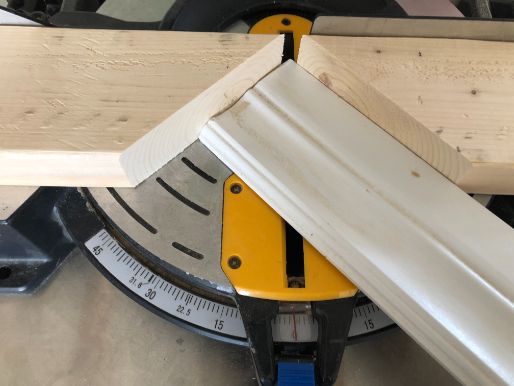
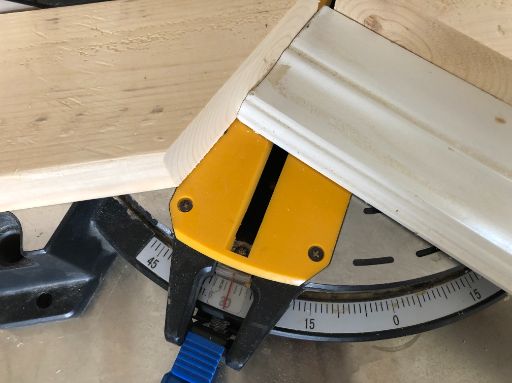
in order to cut past 45 degrees on your miter saw you’ll need to set up a jig. This jig will allow you to cut upto 85 degree angles.
You’ll need a scrap piece of board about 4 inches wide and the length of your miter saw’s fence. Glue or clamp the scrap wood to the fence. Use clamps if you only need to make a couple of cuts. If you need to make a large amount of repeated cuts I suggest gluing the jig to your fence with regular wood glue (this won’t hurt your miter saw’s fence at all).
Once the board is secured to the fence all you need to do is make two cuts. Adjust your miter gauge all the way to 45 degrees. On one side, and make a cut. Then adjust the gauge to the other 45 degree location and make the second cut. You should now have a triangle cutout, and your jig is complete.
How to use the jig to cut past 45 degrees
To use the jig you’ll need to know what angle you need to cut at. To set your miter saw with a jig to the right position take the angle you need to cut and subtract 45. For example, if I need to cut a 75 degree angle, I’ll adjust my miter gauge to 30 degree as the jig will account for the other 45 degrees (30 + 45 = 75).
Here’s a quick reference chart for what position to set your miter gauge in to get the increased angle.
With Miter Gauge Jig Installed:
[gauge setting = actual angle]
| 0 | = | 45 |
| 5 | = | 50 |
| 10 | = | 55 |
| 15 | = | 60 |
| 20 | = | 65 |
| 25 | = | 70 |
| 30 | = | 75 |
| 35 | = | 80 |
| 40 | = | 85 |
| 45 | = | 90 (back to 0) |
General tips for cutting past 45 degrees on your miter saw
Here’s a fantastic video explaining in detail how to execute the above advice:
You’ll want to ensure that you have everything you need set up before you need to begin.
This initial step may appear basic. However, once you get a feel of using a miter saw, you’ll want to get it right the first time you do it. Therefore, before you begin sawing, you need room to work.
When forming angled cuts, you need to be extremely accurate than when doing ordinary sawing. Therefore, your working space must have sufficient room.
Setting up your miter saw to cut more than 45 degree angles takes a little bit of preparation. Once you get the jig set up, however, you’ll be making cuts quickly and efficiently. Take the time to set yourself up right!
Tools Required When Making Cuts Greater Or More Than 45 Degrees On A Miter Saw
- Miter saw.
- A workbench.
- A square or ruler.
- A protractor.
- A pair of safety glasses.
- Wood stock for creating a jig.
- Carpenter’s pencil.
Ensure you set the miter saw blade to 0 Degrees. Put a square on the table lying against the fence on one edge. Then, lower your miter saw and slip the square to the blade edge. When doing this, you may need to elevate the blade guard.
Ensure that the square stands securely against the fence on one side while keeping the blade on the alternative side. You need to adjust the miter saw to make the blade if there are any gaps. You can also read the manual for the saw.
When doing a 45-Degree cut, position the miter saw blade at the 45-Degree angle. Mark the baseboard at the position where you want to slice. Inspect it at least two times before cutting it. With the saw switched off, lower the blade until it touches the wood to ensure that the miter saw blade falls into line with the mark.
If the blade and mark alignment is needed, adjust the board. Hold the wood right into position using one hand and then use the other hand to gradually and uniformly bring down the miter saw and operate the blade through the wood.
Don’t push the blade down. As soon as the board is cut through, switch off the saw blade and give the blade time to stop completely before lifting the blade from the wood.
How Do You Cut A 70-Degree Angle On A Miter Saw?
Measure and mark the point you would like to begin at the 60-Degree angle. Ensure your speed square is set firmly against the edge of the wood, on the wood surface, and the edge of the square that sticks out.
Slip your square across the lumber until you get to the mark you had made on the pivot point edge. The pivot of the square is the side of the lip that has an arrow pointing towards it.
While holding the pivot point securely to the mark, slip the other end of the bulging edge of the square away from the lumber until the wood edge falls in line with the usual 70-Degree on your speed square.
Sketch a line along the short level edge of the square that sits on top of the wood. Remove the square using a straight edge and complete sketching the line the rest of the way through the wood. To close the same angle as the line, tile the jigsaw or circular saw, and then begin slicing the line gradually to form your 70 degree miter saw.
Using a tape measure and a pencil, mark the point you would like the angle to start on your wood. At the front of your miter saw, let loose the angle adjustment handle and twist the miter saw until it measures 70 Degrees.
Press the wood securely against the fence of the saw and begin to cut at the line you marked. Slice the wood and scrap of the piece to the side.
How Do You Cut A 135 Degree Angle On A Miter Saw?
Position the Miter Saw
The outer 135-Degree nook is similar to an outside 90-Degree corner if you’re using a transition piece. Position your miter angle to 11 ¼ Degrees for all the cuts you make.
Without a transition piece, you can move around the nook and position your saw at an angle of 22 ½ Degrees. For more information on producing a transition piece, follow the outer 90-Degree nook.
Cut at an Angle of 22.5 Degrees (45/2)
Usually, you’ll see 135 Degrees corner where the two walls meet with a sharp edge in either direction. Your nooks can cut similarly. Every molding that comes together to form around the corner contributes equally to this. Therefore, each of them has to be cut at a 22 ½-Degree angle.
Perpendicular Angle Position
You can also cut all nooks. Alter the miter angle to produce a precise cut. So, when you place your molding in the saw, you’ll be pressing the saw flat against the fence.
The flat part touches the wall on the left side of the corner where the mold is. Ensure that the saw is at a right angle to get the molding in place. Then, cut with the molding from the right side of the nook.
22 1/2-Degree Miter Angle
If you want to create a miter cut on the left side, place your saw to the left at the 22 1/2 –Degree miter angle position. Mold it into position and cut. If you have two crip corner pieces, you can fit them together flawlessly.
However, you have to carry out adjustments at the base of your parts with a utility knife.
Additionally, you can cut out the base sharply into the wall carving. After that, put them together and you’ll be done with any crack at the base of the molding. When you complete the project, the wall will be concealed.
How Do You Cut A 60-Degree Angle With a Miter Saw?
Get your jig ready
Because the miter saw can only create cuts up to 45 Degrees, you have to make an easy jig before performing a 60-Degree cut.
To begin with, put your miter saw on your workbench and modify the saw to 30 Degrees. Ensure that the fence is safely secured at 30 Degrees. It’s because you require a precise 30-Degree jig to have a correct 60-Degree angle for your perfected product.
Before cutting, ensure that you’ve put on the right safety equipment. Gloves and safety glasses are a requisite. You can take into account some high-quality earplugs also.
As soon as you’re ready, it’s time to chop your jig. Put your wood stock safely against the fence and then cut through the lumber. Don’t rotate the miter saw blade until you’ve removed your jig from the saw table.
You now have a 30-Degree cut in your jig. If you have a lengthy piece of lumber that’s bulging from the saw table, cut it so that it’s around 6 inches long in total.
Make the 60-Degree cut
Set the saw to cut a 30-Degree angle and put your jig against the fence. To fasten the jig against the fence, use a clamp and ensure it doesn’t move at all. This is a crucial step as it’ll make sure that you get an accurate 60-Degree with your final cut.
You can accomplish a 60-Degree cut with your jig into position and your miter saw set to 30 Degrees.
Put the piece of wood that you want to make a 60-Degree cut against the jig you’ve formed and ensure that it’s right up against the jig. You can now cut your piece at the 60-Degree angle you require.
How it Works
Because the jig you formed has been cut at a 30-Degree angle, the angle on the saw is increased by 30 Degrees. In this case, you need a 60-Degree cut and, therefore, the 30 Degrees jig added to 30 Degrees the saw was adjusted to cut brings you to 60 Degrees.
You can form jigs using any angle starting from 1 to 45 Degrees. It allows you to utilize your miter saw to cut lumber at any thinkable angle. With this trick, any miter saw becomes more versatile.
Inspect your work
If you’ve adhered to the first and second step, you should achieve an accurate 60-Degree cut in your perfected product. However, you can still check your correctness using a protractor before beginning the installation procedure.
This guide on how to cut a 60-Degree angle on a miter saw will help you know how to read a protractor if you’re somewhat blurred from your last geometry lesson in high school.
The only thing you need to do is put the protractor’s origin point on the tip of the lumber piece you’ve just cut the 60-Degree angle. Ensure that the 0-degree line is accurately aligned with the edge of the lumber.
Then, follow the angle of the lumber to the top so that you can take the measurement. You should now be having an accurate 60-Degree angle once you’ve done everything perfectly.
Cutting a 65 Degree Angle on a Miter Saw
Set the miter saw to 20 Degrees and cut the little piece of 1 by 4 wood.
If you can safely secure the 1 by 4 piece, use a miter saw to cut through against the 20 Degrees cut. It’ll give you a triangular piece of lumber that’s a right triangle with a 20-Degree angle. Ensure you adjust the miter saw to 45 Degrees.
Put the 20-Degree block of lumber in a way that the small point faces towards the saw blade. If you put a piece of lumber against the block, the wood will have a 65-Degree angle.
You may also be asking “what is 120 degrees equivalent to on a miter saw?” For a 120-Degree angle, you’ll use an angle of 30 degrees on a miter saw.
Cut an Angle Exceeding 45 Degrees on a Miter Saw Easily
If you do a lot of work with lumber, be it projects in your workplace or your workshop, one crucial thing you should know is how to cut angles that exceed 45 Degrees on a miter saw.
A 45-Degree angle frequently appears when mounting crown moldings in your household and if you’re cutting boards for things such as window, picture frames, and square door. We hope that this article has been helpful to you, and now you can cut angles more than 45 Degrees on a miter saw.