Easy fix for Miter Saw Blade Guard Sticking

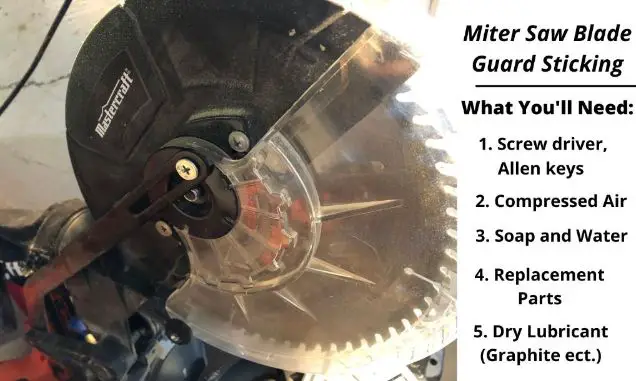
So Your Miter Saw Blade Guard Is Sticking:

Miter saws are a critical and helpful power tool in any woodwork station for precise and accurate angle cuts. However, due to continuous usage over time, the tools may malfunction or break down due to wear and tear. One of the parts of a miter saw prone to damage is the blade guards as they are exposed. 

When this happens, the blade guards may tend not to perform optimally and fail to retract as they should and thus end up sticking while undertaking your various woodworking duties. This may be frustrating and stressful to the user, at best, and lead to a safety issue at worst. Luckily this issue may be easily solved by a quick cleaning or replacing the blade guards, as they are reasonably cheap. 

A miter saw blade guard is a safety feature put in place to protect the carpenters and woodwork experts from injuries as they undertake the various rigid woodworking projects. The miter saw blade spins at a high rate of speed; thus, caution should be put to avoid accidents in your workshop. The blade guard is usually made of a plastic piece that covers the spinning blade. As you start to make a cut, the guards move up a little, giving you adequate space for the safe cutting. 

Apart from protecting you from hazards, the miter saw the blade guard helps direct sawdust to the back dust chute and into the vacuum or the collection bag. It is wise always to ensure that the blade guard is in place while working on any woodwork tasks, due to safety concerns. It is not wise to compromise on your well-being because of a blade guard, which is relatively cheap in the market.

This piece will enlighten you on why your miter saw blade guard is sticking and how you could fix it.

Let’s get to details.

How do I know if my miter saw blade guard needs to be replaced?

Before you go through the trouble of buying replacement parts, let’s check to see if a good cleaning won’t solve the problem first.

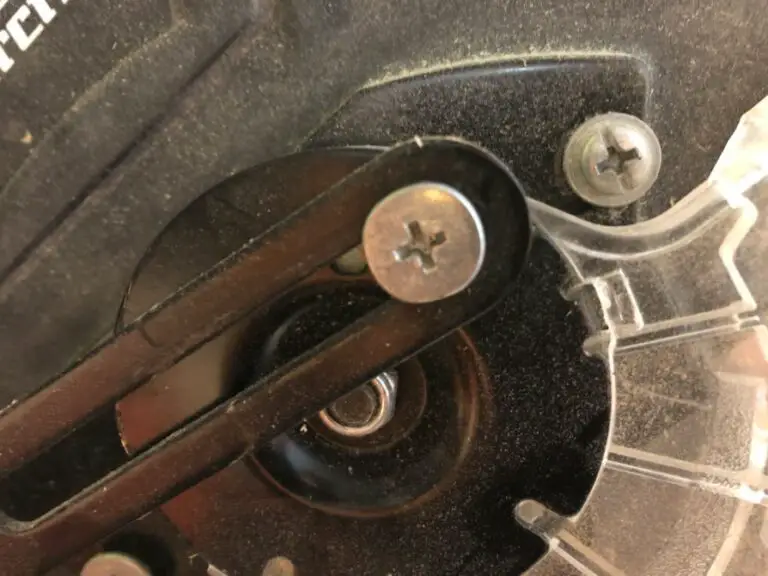
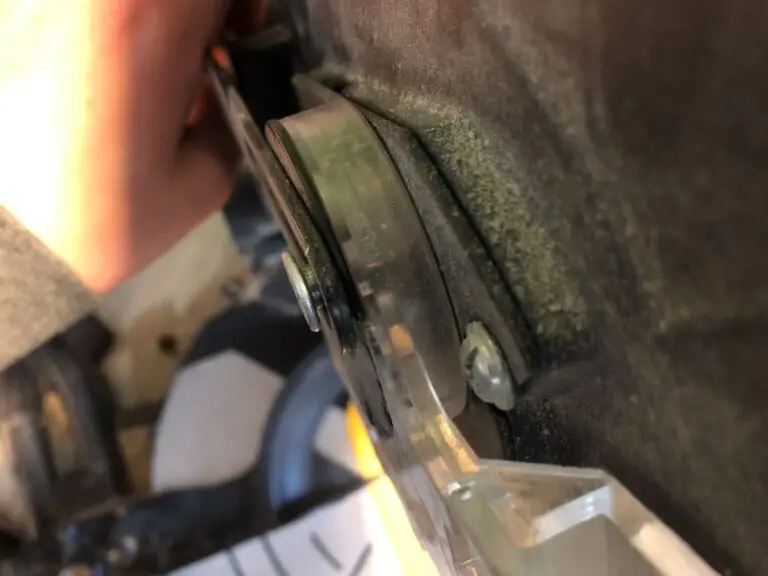
Start by removing the guard. The guard on most miter saws is usually attached with a couple of bolts/ screws. Guards normally have a bracket that attached the guard to the back of the miter saw so it retracts as the blade moves down. Some miter saws use a spring mechanism to retract the blade guard. these aren’t too different and shouldn’t be any harder to work on.

Here’s a video of a sticky blade guard with a spring mechanism, getting replaced:

And here’s the bracket mechanism version:

Whether you have a spring or bracket mechanism isn’t going to make your life any more difficult. Both styles are simple to work on, and should be a quick fix either way!

If your miter saw is no longer under warranty, or you can’t find the part you need from the original manufacturer, try ereplacementparts.com If you can’t find what you need there, you should still be able to find a generic after market part that will work for your miter saw’s model.

Once you’ve removed all the parts of the blade guard from your miter saw, give it all a good cleaning (this would also be a good time to clean out the rest of the miter saw as well). The main enemy of the moving parts on your miter saw is saw dust. little by little it will build up overtime. Add in a little moisture, and you’ve got problems on the horizon! 

Start the cleaning by giving everything a good blast of compressed air. A vacuum set to blow will work in a pinch. after the loose bits are removed giving everything a good cleaning. The plastic parts can be cleaned with soap and water. Note any areas that were intentionally greased on other parts and ensure you replace the grease when reassembling. 

Once everything is cleaned up, give all the parts a good inspection. Check for anything broken or cracked, these will need to be replaced. If everything looks like it’s in good working order, you’re good to start putting things back together. 

One thing you’ll want to make note of while you’re reassembling, is that some of the bolts might be intentionally loose. For example, the bracket that retracts the blade usually has a little play in it, as it needs to glide freely. This shouldn’t be too much of a concern, just know that the bolt might have a certain depth they are supposed to be tightened too, all the way down might not be it.

If you’ve installed everything back together and you’re still having issues, or you made them worse… (been there done that), you’ll need to go ahead and order the new replacement parts.

How to Replace the Blade’s Guard on a Miter Saw

What you need to replace miter saw blade guard

When your blade guard on your miter saw sticks even after you’ve cleaned everything up and reapplied grease or lube as necessary, the next step is to replace the parts.

  • Order a New Miter Saw Blade Guard

A miter saw blade guard is not an accessory that is commonly replaced; thus may not easily access it on your local hardware store as it is not replaced more often. However, it would be best if you opted to order one from  the  manufacturer of your miter saw, if possible. If you can’t find the exact model from the manufacturer, you’re not totally out of luck. A large market for generic third party replacement parts exists and you can often find what you need there.

  • Unplug the miter saw’s power cable

The first thing to do is to ensure that you have unplugged the power to your miter saw. It is essential to ensure that you have unplugged the power cables before you could start the repair. Your safety comes first. Thus it would be best if you did not compromise on that.

  • Loosen your Miter Saw Nuts and Bolts
miter saw blade guard bracket bolt

After unplugging the saw, you should loosen the bolts and nuts that hold the guard in place. A couple different screw bits may be required for this process. For instance, you may need to use a flathead screwdriver or an Allen wrench. Twist the nuts anti-clockwise to remove them out. Gently lift the miter saw blade guard out of place. Watch out when working around the blade, as they can still be quite sharp, even stationary. (unless your blade is dull, then it might be a good time to replace that as well.

Important:

The bolts connecting the bracket are usually intentionally loose. There should be a gap, and the bracket should have some play. This is normal, and necessary for the bracket to move freely within its intended range of motion.

miter saw blade guard bolt space

Don’t Over Tighten!

  • Attach the New Miter Saw Blade Guard

Firmly put the brand new miter saw blade guard in its exact position on your power miter saw. Affix the bolts and the nuts, and ensure that you firmly and securely tighten them into place. While doing this, you may take the chance to scrutinize other components of your miter saw to ensure that they are firmly tightened up. You should also ensure that your miter saw blade is not wobbly and loose. 

Note why your guard might have been damaged. Was it normal wear and tear? Did the miter saw get dropped or have something fall on it breaking it? The main concern here is that the blade or the spindle on which the blade sits is compromised, and that caused damage to the blade’s guard. 

Regular maintenance and repair of your miter saw will go a long way in ensuring that your miter saw is in great shape and increasing its lifespan. A miter saw which is in good condition will increase efficiency and productivity and produce clean and neat work. Thus when your miter saw blade guard is in lousy shape, you should opt to get a new one.


Miter Saw Storage Ideas: 6 Easy ways to store your miter saw

Miter saw storage is an important part of owning a miter saw. Carpenters and woodworkers typically spend a pretty penny on their power tools. Therefore, safe and proper storage of your power tools is of utmost importance. If you fail to adhere to this, there is a high possibility of them getting damaged or being prone to rust, which may be quite costly to replace or repair.

As a novice in the woodworking industry, it may be challenging to decide where to store your miter saw properly. Luckily, there are various safe and secure ways in which you can store your power tools.

To keep your miter saw in perfect working condition and safe, you need to know how and where you should store your power tool. Most carpenters and DIY masters will store their miter saws in the basement of their home, garage, and workshops.

There is a wide range of ideas on how you may store your various home tools. Apart from the conventional storage facilities used to keep miter saws, there are expensive storage cabinets that high-end woodworking experts may use. However, a handy way to store your own power tools is to hang pegboards on the walls of your workshop, basement, or garage.

Hanging your power tools will help keep your working station neat and organized. For smaller miter saws, you could use a drawer storage system to safeguard them from dust.

If possible, it is recommended that you store your power tools in their original cases or the boxes in which they were purchased. If you opt to store your miter saws on tool benches, it is recommended that you put silica gel packs to absorb excess moisture and prevent your miter saw from rusting.

This piece will enlighten you on the appropriate miter saw storage.

Let’s get to it.

Table of Contents

Miter Saw Storage Cover, Box, Shelf, Case, Cabinet

Safe storage of your miter saw is essential to protect it from theft, damage, or moisture. There are various ways in which you could safeguard your power tool from rust. Here are some of the ways that you could store it:

  • Miter Store Storage Cover

A miter saw cover will protect your power tool from elements that could expose it to rust, especially if you conduct your woodwork projects outdoors. The cover is made of a robust, canvas,  material that is also waterproof. The cover will help to safeguard your miter saw from dust and water. It is very convenient and affordable, and you can even make a customized one at home.

Having a cover for your miter saw will make a world of difference. When not being used you miter saw won’t be exposed to the dust or overspray from other projects. It’s an easy and affordable way to keep your miter saw in tip top shape. 

One important factor you need to consider with a miter saw cover is moisture. If for some reason your shop is very humid or if you have a liquid spill and not notice it spill around the miter saw you could be in for some trouble. 

The cover will protect the miter saw from dust and debris, but will trap moisture. Therefore, if moisture is a concern, you might want to consider an alternative storage method below.

  • Miter Saw Storage Box

A wooden storage box is also suitable for the safe storage of your miter in addition to protecting it from moisture and other destructive elements. Some other storage boxes are specially designed with a handle; thus, you may easily carry your miter saw from one place to another as you undertake your various woodwork projects.

I like this storage method a lot! Although it’s going to take a bit more effort to build a good case, even a basic case will be a big improvement. A rigid case means that anything that falls on your miter saw or anything flying around your shop won’t result in damage to the miter saw, maybe just a dent in the box case. 

Just building a box without a bottom that can sit on top of the miter saw is all you need. Add in a bottom piece, and couple latches on the bottom and a handle on top and you got yourself a sturdy travel case for your miter saw!

All you really need is some scrap Plywood or MDF to get started on a basic storage box.

MDF miter saw storage box
  • Miter Saw Storage Shelf

Specially designed shelves on the walls of your workshop will not only keep your work station organized due to easy retrieval of tools when needed but will also keep your power tools safe. Keeping your tools above the ground will minimize the exposure to rust-causing elements. Some woodworkers have made some really impressive shelf attachments for their miter saws

If you don’t need to have your miter saw in a ready to use state, a designated shelf for it isn’t a bad idea. Easily accessible, yet out of the way when not needed.

I used to just leave my secondary, large, seldom used miter saw on a shelf in the shop. It wasn’t the worst spot for it, but I knew it could be improved.

Miter saw storage shelf
  • Miter Saw Storage Case

To keep your miter saw in perfect shape and to increase its lifespan, you could store it in a case. There is a wide range of cases made by different brands in the market. The cases are specially designed to protect your power tool from any damage and also for easy carrying of your miter saw.

The advantage to a hardshell case made for your miter saw is that it will likely be more compact and lightweight over a box case you can make yourself. 

The disadvantage of a hardshell case is that they’re very expensive relative to the box case you can make yourself. Unless you get a great deal on a hardshell case, or it comes as a bundle with the miter saw I’d opt for building one myself. A DIY box case can cost you next to nothing if you have enough scrap wood laying around. A hardshell case for a miter saw will likely cost you at least $100. The DIY method is enough for me!

  • Miter Saw Storage Cabinet

Storage in a cabinet is safer; this is because you can lock the cabinet. The cabinets will also safeguard your power tool from dust and dirt in the workshop. You can easily design your cabinets using wood in your workstation. When building cabinets for your miter saw, it is recommended that you place the anti-rust liners for extra protection. Some brands nowadays sell cabinets that can charge your tools.

A miter saw cabinet is the ultimate miter saw storage method. Although you will likely have to do some custom work to get you miter saw to fit just right. Some really nice miter saw cabinets even convert into a great miter saw station during work, and convert back into a solid storage cabinet once the project is completed.

Where Should I Store my Miter Saw?

The decision on where to store your power tool depends on the size, design, and the type of your miter saw. If your workshop has limited space, you could opt to hang your power tools to save on space and make it organized. Some miter saw is gigantic and is mounted to a fixed table stand. In this case, you should ensure that you mount it in a secure place free from moisture and dust. You could also use a waterproof cover to safeguard it when not in use.

To protect your workshop from pilferage and theft, it is recommended that you place it in a secure neighborhood and always lock it when not in use. Power tools are expensive; thus, you should safeguard from getting lost and also from breakage.

When building your workshop or garage, you should ensure that you can control the humidity and temperature.  Although some power tools may not be affected by the moisture, most of them can be affected by freezing temperatures as they make the plastic and metallic parts of the miter saw to be weak or brittle. This may cause your miter saw to be damaged.

How do you hang a Miter Saw on a Wall?

One of the ideal ways of storing your miter saw is hanging it on the wall of your workshop. You could do this by building a structure that will enable you to firmly keep it in position and strong enough to protect it from falling and breaking. You could fix a rectangular piece of plywood or MDF on the wall, then cut two strips. You are then required to make one of the strips a French cleat then use a screw or glue to reinforce the rectangle’s bottom. The structure’s base should be designed for good clamping where you could easily hang your miter saw.

One positive of hanging your miter saw is that you can put it up high where it’s less likely to get damaged when you swing around with a 12 foot 2×4 on your shoulder. On the downside you won’t get much protection from dust or overspray just hanging out on the wall. I’ve used this method and it is one of my favorites if you have a fairly clean and dust free shop. it’s just a super simple and easy storage method.

Proper and safe storage of your miter saw will go a long way in protecting it from damage and increasing its lifespan. For the proper and optimal functioning of your miter saw, you should safeguard it from breakage, dust, and moisture.