Here’s a great video about cleaning the linear bearings on the sliding rails of your miter saw. You’ll want to check this out if you’re sliding miter saw has rails that have become hard to slide.
If you find that your miter saw isn’t moving as freely, or as smoothly as it once did, it’s likely time to apply lubrication such as oil, grease, or a dry graphite.
Part of miter saw maintenance is ensuring the hinges and sliding rails of your saw is in good working order. These parts can collect dust and dirt over time.
The performance of the factory lubricant will also decrease over time.
Ensuring that every part of your miter saw moves in a smooth and easy fashion will make your jobs a lot easier.
Lubricating your miter saw with the appropriate grease, oil or graphite is a vital component of miter saw maintenance. It is important to apply the correct type of lubrication to the correct part.
This guide will help you find the right solution for the miter saw part that is giving you trouble.
This guide will cover the following parts that need to be lubricated: rails on sliding miter saws, chopping hinge, bevel, miter gauge, and plastic covers. Further, many people also like to apply an oil (such as mineral oil) to the blade and the fence as a rust prevention technique.
We’re going to cover all of these, and give you some recommendations on the best way to get this done!
Each part will have its own category so feel free to skip ahead and find the solution you are looking for.
Below are some quick tips for lubricating miter saw components.
Basic steps for lubricating any miter saw part
The following is a general method for lubricating any part of a miter saw. You’ll find a more detailed explanation for each moving part below.
This is the 5 step, basic method I when lubricating my miter saw.
- Spray compressed air to remove as much sawdust and debris as possible (not just the affected area, but around the entire miter saw).
- Inspect the area for any obvious problems such as rust or corrosion.
- Clean the area of corrosion, and old lubrication with WD-40 (use scotch brite pads to clean sliding rails as needed).
- Ensure the area is clean and dry before applying a dry lubricant
- Once lubrication is applied, move the miter saw through its motion a dozen or so times to help work the lubrication into the parts.
That’s it! Lubricating your miter saw is a simple process that shouldn’t take up much of your time.
If your miter saw isn’t moving as freely as you want it, it really is a simple fix!
What kind of miter saw lubrication should I use?
Let’s start by talking about the types of lubricants you should use on your miter saw.
It may seem that there is a never ending selection of lubricants for your miter saw. It’s true there are a lot of lubricants you could be using.
This section will help you narrow your choices down to only a couple, regardless of which part you need to lubricate.
First thing, a lot of people might want to reach for a greasy oil or lubricant. I strongly suggest avoiding wet lubricants for most parts of your miter saw.
The reason for this is a wet oil or grease will collect any sawdust and debris that comes near the part. This means that your lubrication won’t last as long and you’ll be back repeating these steps in the near future.
Use a dry graphite or silicone lubricant where possible. These types of lubricants tend to last longer and perform better for our uses.
For the sliding rails of a miter saw, a dry lubricant is the only kind you will want to use.
Dry lubricants are slightly more expensive, but the cost is made up for in the products utility. Dry lubricants last longer, so you won’t need to apply it as much, resulting in long term savings.
Also, when I say savings, a tube of dry lubricant will be $6-10 dollars, versus $3-7 dollars for a cheaper wet alternative.
If money or accessibility is an issue for you, a single can of WD-40 will get your saw into working condition, until you can get ahold of the recommended products.
For areas such as the chopping hinge, where the joint might have a plastic cover, you can use typical wet oil.
There’s nothing wrong with it, but you will see better, longer lasting results with a dry lubricant.
Honestly, if I needed to lubricate my chopping hinge and a wet oil would save me a trip to the store, yes I would use it. Just because it isn’t ideal, doesn’t mean it isn’t an alright option.
Lubricating the rails on a sliding miter saw
This is the most problematic area of a miter saw when it comes to maintaining lubrication.
The rails are often exposed to whatever the conditions of your work space is. Let’s be honest. Shops are dusty to begin with. The rails are in close proximity to any dust and debris that the miter saw makes during a cut.
If your miter saw isn’t sliding like it once was, it’s time to reapply some lubricant.
The first thing we want to do is look over the rails to see what condition they are in. you want to check for any possible corrosion that has occurred over time.
If there is corrosion, don’t worry. While it isn’t ideal, it isn’t tough to fix, we’ll get through it.
You’ll want to first spray the area with compressed air to blow away any dust and debris. You can do this is with canned air or an air compressor.
Once that is out of the way we can move on to fixing corrosion. This is easier than you might think. Steel wool or a scotch bright pad will likely be all you need to remove the corrosion.
If you find the corrosion to be putting up quite a fight try using some mineral oil or even WD-40 to help break down the corrosion.
Note that we’re talking about corrosion and not serious rust. If your miter saw rails are badly rusted and a simple cleaning as mentioned above isn’t doing the trick.
You might need to move on to more serious methods. Serious rust might also compromise the integrity of the rails and may need replacing.
If you didn’t have any corrosion or you’ve finished the corrosion cleaning step, you need to wipe the area with a clean shop towel to remove any leftover dust or old lubricant.
Once the miter saw rails are clean it’s time to reapply a lubricant. There are a lot of oils and types of grease on the market, but I highly recommend going with a dry graphite lubricant.
A dry graphite lubricant is the only thing I would use on my own miter saw. Being a dry lube, it won’t attract dust the same way as a wet lube would.
Since sliding rails are exposed it is easy for them to collect dust and debris. Don’t give that dust any extra reasons to stick around.
Applying dry graphite is simple. It usually comes in a tube, a container that can blow the graphite onto the target area or with a brush.
Simply apply the graphite to the rails and slide the miter saw back and forth a dozen times to ensure its getting full coverage.
You’ll find it does its job quite quickly and you miter saw will be back to sliding like new!
Oiling the blade of your miter saw
I’ve never needed to do this, and have always thought it to be an unnecessary addition to the maintenance of my miter saw.
I’ve seen online that many people like to apply mineral oil to the blade before or after use.
I consider this more of a cleaning technique than part of lubrication maintenance. I won’t talk about cleaning a miter saw blade as I’ve covered that topic much more in depth in another article.
I’ve also seen some miter saw users like to wipe their blade down with a rag lightly covered in an oil or grease.
They do this to prevent rust or corrosion on the blade. This might work fine, but I do have some concerns about it. Mainly, that any oil or grease from the blade my get onto and ruin a work piece.
The second reason I’m not confident in this approach is that I’ve kept my miter saw in a very damp work space at my parent’s place, and never had an issue with rust or corrosion on the blade of my miter saw.
On the flip side, where I currently have my miter saw set up is very dry, and still haven’t seen an issue with rust or corrosion.
I feel that you could get much better results by regularly cleaning the blade of your miter saw. Not only will this prevent bad build up of rust and corrosion, but you will also have a clean blade that performs better.
If you want to regularly apply mineral oil to the blade of your miter saw, go for it. Personally, I get by fine enough with a regular cleaning. I’d stay away from applying a tacky oil or grease that might get onto your material and ruin it.
Do what makes sense for you, but this is what I am currently doing for my miter saw blade, and I haven’t had an issue with my blades not having enough lubrication.
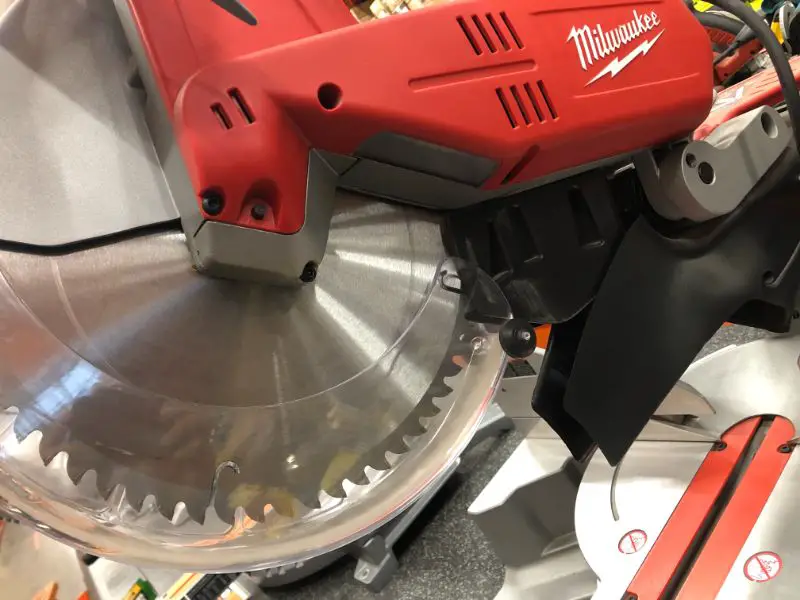
Lubricating The Miter Saw Chop Hinge Or Pivot
Next to the slide rails on a miter saw, this is the next part that you’ll likely have to apply oil to. The chop hinge, also known as the chop pivot, is the most used part of your miter saw that needs lubrication.
Every single time a cut is made the hinge is moving. That’s an opportunity for saw dust and debris to collect in and around the hinge. If your miter saw hinge is sticking or isn’t moving as freely as it once did, don’t worry, it’s an easy fix.
Stary by visually inspecting the hinge. I always like to spray the area with compressed air to blow away any stuck dust or debris away from the hinge.
After that, make sure the area isn’t affected by rust. While it isn’t all that common, rust on a miter saw hinge can also cause it to seize up.
WD-40 will make quick work of rust. Simply apply a generous amount to the hinge and put the hinge through the chopping motion a few times to work in the WD-40. You should find it loosening up quickly, and moving much more smoothly.
After that, most miter saw owner’s manuals will tell you to apply a machine oil to the hinge. Choose a machine oil and apply. Start with a small amount, and work it in my moving the chopping hinge up and down.
Apply additional machine oil and repeat as necessary.
Note that WD-40 shouldn’t be used as a replacement for machine oil. WD-40 is designed to dry away and isn’t the best long term lubricant.
You’ll get good immediate and short term results, but you’ll find yourself reapplying it often if you try to use it in place of machine oil.
I’ve only ever needed to apply oil to my miter saw chop hinge once. It’s nice to have a part of your tool run more smoothly, especially if you’re using it heavily.
The chances of you having to apply oil to your miter saw’s chop hinge a second time in its lifetime would be quite rare unless you’ve stuck in on a shelf somewhere damp for a few years. Miter saws are quite rugger tools, that’s why they’re one of my favorites!
Miter Gauge Lubrication
If you find the miter gauge is beginning to give you a difficult time when you try to move it around a simple cleaning and lubrication will work wonders.
The miter gauge sees the most saw dust and debris as any part of you miter saw. Seeing as the gauge is the closest moving part to the blade, it’s no wonder.
To begin, spray the area with compressed air. Canned air or an air compressor, both will do the trick. You might want to carefully tilt the miter saw on its side and blow air underneath the saw as well.
Depending on the make and model of your miter saw, you might have more protective coverings. You just want to be sure that any area around the miter gauge is free of saw dust.
Once that’s taken care of I like to spray the area with WD-40 and move the miter gauge through its full rotation. This will help the WD-40 sink in and do its job.
I also like to apply WD-40 to the crease of where the miter table swivels, as it is an area that can collect a fair amount of dust as well.
When the WD-40 has done its job you should notice that your miter gauge it moving much better. Once the WD-40 has dried away, you’ll want to apply a dry lubricant.
A dry lubricant will ensure that the miter gauge is well oiled, but more importantly it will not collect dust like a traditional oil.
Apply your dry lubricant and again move the miter gauge through its full rotation, about a dozen times. Your miter gauge should be moving freely and be all set for a long time.
If you are still experiencing a problem or the miter gauge is still not moving like it should, you’ll have to resort to more serious measures.
Bringing it in to be serviced is the only real solution I can offer you from my own experience.
Miter Saw Fence Mineral Oil Treatment
I’ve seen a few people online claiming that they like to wipe the metal fence of their miter saw down with mineral oil as a form of maintenance.
While I’ve never done this, I can’t see the harm. For myself, my miter saw sees enough use that any corrosion or rust that has a chance to build up will be quickly taken off by the material that get run through my miter saw.
I can’t recommend doing or not doing this, as I haven’t really seen a need for it, either way.
Personally, I don’t feel the need to wipe down the miter saw fence with a mineral oil. A quick blast from an air compressor does enough for my own uses.
Lubricating plastic covers and guards on your miter saw
Over time the cover on you blade may not move as freely as it did out of the box.
These types of covers and guards are not typically lubricated as they usually just sit on a bolt and are kept in position with a spring.
If your plastic cover isn’t moving as it should blasting the area with compressed air should help.
If the problem persists, most miter saw models the guards can be taken off fairly easily. Some models will glue the cover together making it impossible to remove, but many are just screwed together.
Once removed, again blast the parts with compressed air. Look at the bolt or hinge where the cover connects to the saw. Clean the part to remove any old lubricant or debris from the connecting bolt.
Apply a dry lubricant as needed and put the cover back into place.
This should solve any issue you have with plastic covers or guards not moving as they did new!
General tips for miter saw lubrication
Most manufacturers state in the owner’s manual that the actual bearing and internal components of their respective miter saws are lubricated sufficiently for the lifetime of the miter saw.
They mention that exposed areas such as the chop hinge (or chop pivot) and slide rails may require additional application of oil or lubricant as needed.
This means you will not need to lubricate internal parts of the miter saw. If in the rare case you do need to, it will likely be due to water damage or some other form of unlikely damage that may require much more attention than a simple reapplication of oil.
I don’t recommend opening up internal compartments of your miter saw.
It isn’t my area of expertise, and you’ll also be voiding the warranty. You may be able to bring it into a shop to have it professionally looked at.
However, I usually recommend weighing your options and considering putting the money you’d spend on a repair, towards a new miter saw.
You have to decide for yourself if paying 50-100 dollars is worth fixing a worn miter saw when a quality new miter saw can be purchased for 200-300 dollars.